


The hardware and software used in the making of the project
Why did we make al-Aqsa 360°?
The goal of al-Aqsa 360° was to provide a window into Jerusalem's holiest mosque - a place whose rich cultural heritage has also been a source of great controversy among Muslims and Jews.
By virtue of its location in the heart of occupied East Jerusalem, al-Aqsa Mosque compound is not accessible to all who may wish to visit. With this in mind, Al Jazeera decided to create a virtual tour that would allow viewers to explore the compound through a high-definition, online experience.
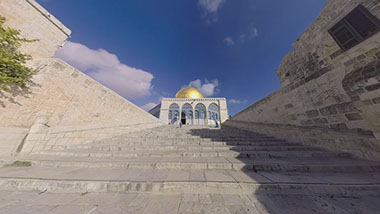
The picturesque Dome of the Rock - part of the al-Aqsa compound
The equipment
We were equipped with two VR video recording systems, including the handheld Ricoh Theta S, which is approximately the size of a small smartphone and is designed specifically for capturing 360° video and still footage. This camera is composed of two lenses on opposite sides of the device that each record in 180°. When the material from both lenses is stitched together, it generates a full 360°, 1080p HD video.


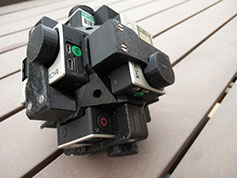
Left and centre: The rig containing six GoPros with tripod. Right: The Ricoh Theta S handheld camera
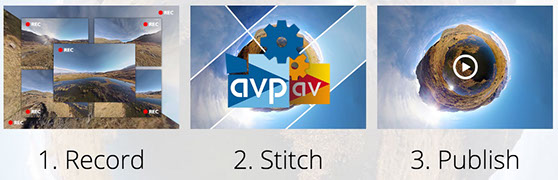
The process
We shot this project over the course of two days. We began with the GoPro rig, setting it up in a variety of locations throughout al-Aqsa Mosque compound. We moved through the compound in the same fashion as any visitor might: We started on the western periphery, then moved up the stairs to the Dome of the Rock platform. We filmed in several locations around the Dome’s exterior, and inside the Dome itself.
Next, we filmed outside and inside al-Qibli Mosque (also known as al-Aqsa Mosque), before moving back to the compound’s edges and towards the exit. You can see the bright daytime sunlight turning into a calm evening sunset as we move through a day at the compound. Generating continuity in the footage was a challenge amid these changing light and weather conditions; at one point during our filming, a light rain started to fall, giving some of the shots a very different mood.
The next day, in order to capture Friday prayers, we equipped two people with the handheld Ricoh camera and asked them to walk around and inside the Dome of the Rock and al-Qibli Mosque, as if they were among the worshippers visiting the site that day. The result was a lower-quality, but more personal and active experience of al-Aqsa.
The second rig that we shot with was assembled by AJ Canvas. It comprises six GoPro Hero4 cameras mounted on each face of a 3D-printed, cubic housing. The field of view of each camera has a large overlap area with adjacent cameras, increasing the likelihood of seamless stitching of footage. Once stitched, the resulting product is a beautiful, ultra-high resolution, 4K video.
The GoPro rig also includes a mount to attach the camera system to a monopod with collapsible feet, making it a standalone device. While this is not the most ideal mounting solution in terms of stability or security, its distinct advantage can be seen in the final footage, as the area recorded directly beneath the VR rig shows just a very small footprint of the monopod’s feet. This footprint can easily be masked, or in our case, covered with the Al Jazeera logo.
The GoPro rig can be operated with a remote control that is synced to all six cameras simultaneously. As a result, the filming process is essentially one-touch recording. However, there can still be unpredictable, fraction-of-a-second discrepancies between each of the cameras as they start recording. To get around this, you must add a common point of reference - such as a loud clap, or a quick, deliberate rotation of the camera rig - to generate a marker around which the software will sync the footage from all six cameras.

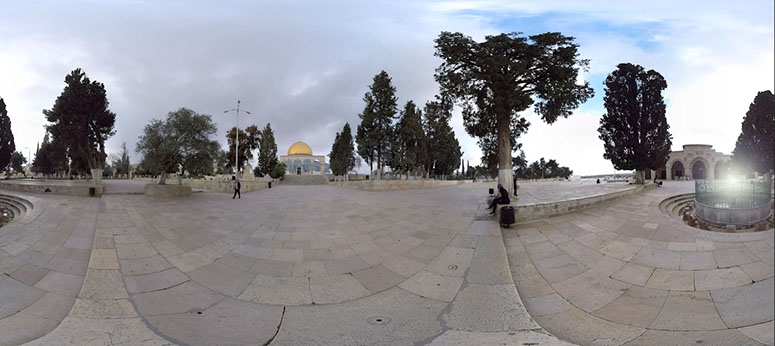
Left: The 4k resolution footage from the GoPro rig. Right: The lower-resolution footage from the more portable Ricoh camera
A different perspective
In a conventional narrative, the filmmaker is completely in control of the viewer’s experience. But with 360° filming, the viewer controls how he will interact with each scene. As such, it is important to pay attention to how the shots are set up.
Best practices dictate that the camera rig should be stable and set up at approximately human eye level. This allows the audience to become more deeply immersed in the scene from a comfortable human perspective, rather than a peculiar, distracting overhead or ground-level perspective.
You must also find the right distance to create a compelling scene. Because the cameras are relatively wide-angle, you need to be close enough to your primary subject to provide enough detail - but getting too close to the subjects around you, or having too much movement near the camera, can create other errors or aberrations when it comes to stitching the footage together. Some of this can be smoothed out through the editing process, but only to a certain point.

The carry bag for all the equipment
Key challenges
The primary difficulty with the GoPro rig was that it was necessary to set this up as a freestanding device and then move far enough away from it to avoid being captured in the shot - yet still close enough to monitor the shot. In some shots, if you look closely, you can catch glimpses of Megan or Wojtek in the background, as this was not entirely unavoidable in some areas of the compound.
In addition, there is the issue of human error and interruption. The camera rig generates a bit of an odd spectacle - a ball of blinking lights on a tall stick. You don’t want the bulk of your footage to be groups of people milling about and poking at the lens, but because you have to position yourself at a relative distance from the camera, you cannot always be in control of what’s going on around it. As a result, we ended up filming shots that were several minutes longer than what we knew we would need, to ensure that we would have enough material to be able to cut out any major interruptions.
The biggest challenge we faced was the fragility of the camera system itself. It is mounted on a small, light base, and if someone is not paying attention, they can easily walk into it, sending it crashing to the ground. The same could be achieved by a light wind, as we unfortunately discovered.
Whooops
About midway through our day of filming, after we had set up the rig and walked away, the wind picked it up and sent it smashing into the ancient pavement, cracking the 3D-printed housing and sending pieces flying across the ground. Miraculously, the cameras themselves were undamaged and we were able to repair the housing with some electrical tape, but we were very cognizant for the rest of the day that another hit could have ended our project once and for all. In the future, we would use a heavier tripod or small sandbags around the base of the monopod.
Pulling it all together
At the end of a day of shooting, the fun of sorting and editing the footage begins.
For the Ricoh camera, the editing process is quite straightforward, as the footage is stitched together automatically and simply needs to be run through Ricoh’s software to generate the 360° images. The quality, however, is much lower than with the GoPro rig.
For the GoPro rig, after you finish shooting, you are left with six memory cards from six separate cameras that must be independently downloaded to your workstation. Diligence and meticulous organisation takes priority, as you must sort and label individual video files from each camera related to each specific shot into a single folder. A good tip for this is to ensure that the date and time on each camera is set correctly, so it is easier to identify which shots should be stored together.
Also worth noting is the battery life. We started with fully charged batteries on the GoPro rig, but by midday, they had drained completely, as had our portable power pack. Luckily, an outlet was available inside the Dome of the Rock, and we recharged everything there. The battery on the Ricoh also drains quickly when it’s in use, and you can capture only around an hour of footage before the memory fills up - underscoring the need to have a computer on hand to copy off the footage, or to be very judicious about your shots.
The moment of impact

The stitching process using Kolor Autopano Video Pro
Once the material was consolidated, we used the Kolor suite of stitching software to merge the six independent shots into one. Once the original footage was synced in Kolor Autopano Video, we moved over to Kolor Autopano Giga, which generates a reference panorama from still grabs within the videos. This maps how each image will be distorted and blended with the neighbouring camera’s footage, and how minor differences in exposure, colour and white balance will be accounted for, to ensure the video is as seamless as possible. This mapping, once saved, guides the video software through its process of stitching the full videos.

After the frames have been merged, it's time to render the high-resolution videos
Once rendered, the result was a conventional (if somewhat odd-looking) piece of 4K video, which we could then move over to a traditional video editor like Adobe Premiere. In Premiere, we cut and edited all of the videos into a sequence that we felt best replicated a tour of al-Aqsa, and added a voiceover track to point out the highlights of the compound and provide viewers with a more immersive experience.
Since the footage is extremely high-resolution, workstation hardware makes a significant difference both in terms of stitching and final edits. The best bet is to use a relatively powerful computer capable of handling such large files with ease (lots of RAM, an SSD drive off of which to work, and a powerful video card). A two-minute segment of video can take around an hour to fully stitch.

The video was edited on a high-end workstation

Once brought into Premiere, it took around 30 minutes to render the seven-minute 4K video
To complete the project, the following
applications were used:
- Adobe Premiere for video editing
- Kolor AutoPano and Kolor Eyes for rendering and viewing the stitched videos
- Ricoh Theta software for the handheld videos
- Adobe Muse for building the mobile and desktop websites
- Photoshop for image resizing
- Illustrator for drawing the vector graphics
- Google Earth Pro for geospatial referencing
- SketchUp for a simple model of the al-Aqsa compound and dimensions
- Sublime text for editing code
Augmenting the experience
This project is our second undertaking in 360° storytelling. A lot of advancements have occurred since we launched our first project, Hajj 360, in September 2015. One of the new fields includes augmenting the user's view with relevant material on-screen.
As part of the tour, we decided to include a 3D model of the al-Aqsa compound to give our viewers a sense of the environment that they would explore.
We decided that the easiest way to annotate important locations was to use the lens flare effect
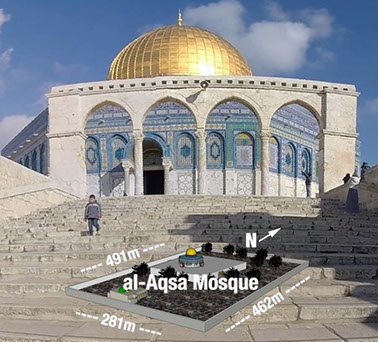
Rather than just relying on the square-kilometre measurement of the compound, we annotated the compound on a 3D model with labels for the Dome of the Rock, al-Qibli mosque and the entire al-Aqsa compound (which is everything inside the walls of the compound)
Watch out for more interactive projects by following @AJLabs on Twitter.
By Megan O'Toole, Wojtek Arciszewski and Mohammed Haddad